>

Oreo And Yogurt Pie With Honey & Fresh Berries
>
>
Dear Friend’s,
Although most of the followers of ChefsOpinion are culinary professionals who visit here and are subscribed via LinkedIn, there is also a large segment of direct subscribers via wordpress who are just starting to enjoy cooking on a basic or slightly higher than basic level.
I have therefore decided to publish, under the moniker “Easy Does It“, from time to time some very basic recipe variations of dishes (and even partially pre-cooked dishes) which otherwise might seem too complicated to some beginners.
I will break them down to the easiest, most simple instructions, so that those of you who are intimidated by elaborate recipes will be able to prepare these dishes properly, adjusted to your taste and liking, right from the get-go.
After all, just because you are not (yet ?) a professional chef should not prevent you from enjoying great food at home. 🙂
Enjoy !
>
>
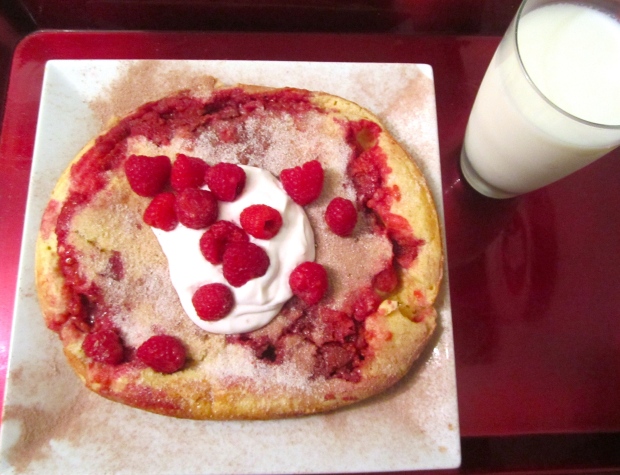
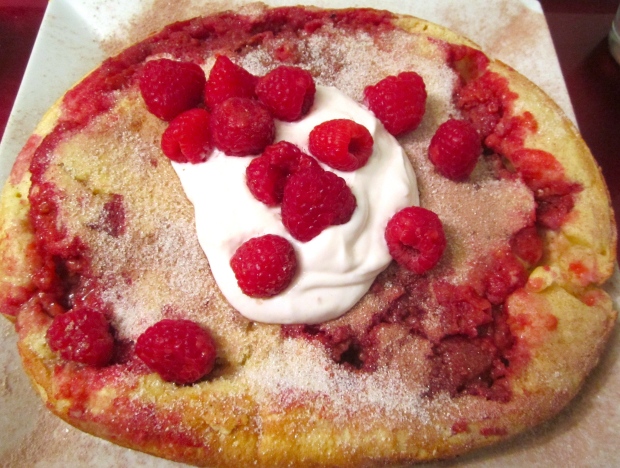
The header of this post could also be “One For The Kid’s” – Oreo And Yogurt Pie With Honey & Fresh Berries, because most kid’s with a knack to help in the kitchen could do this delicious pie all by themself, especially with a pre-baked orio crust as I have used here (or with any pre-baked pie crust for that matter). 🙂
Although as simple and easy to prepare as can be, the flavor of this pie is exquisite, not too sweet and a bit tart at the same time, and the yogurt filling is as light, smooth and creamy as no other.
Very special indeed.
>
Bon Appétit ! Life is Good !
>
>
Click here for more “Easy Does It” on ChefsOpinion
>
Click here for “One For The Kids” on ChefsOpinion
>
Click here for more Pie on ChefsOpinion
>
>
P.S.
See the full recipe at the bottom of this page…..
>
>
>
>

Oreo And Yogurt Pie With Honey & Fresh Berries
>

Oreo And Yogurt Pie With Honey & Fresh Berries
>

Oreo And Yogurt Pie With Honey & Fresh Berries
>
Oreo And Yogurt Pie With Honey & Fresh Berries
>

Oreo And Yogurt Pie With Honey & Fresh Berries
>
>
>
Preparation :
To read instructions, hover over pictures
To enlarge pictures and read instructions, click on pictures
>
>
>
-

- I sometimes make my pie shells from scratch, but nowadays’, (what with my tiny counter space), I usually purchase pre-made shells, of which there are some excellent brand’s out there


-

- serves 4-8
-

- Oreo And Yogurt Pie With Honey & Fresh Berries
-

- Oreo And Yogurt Pie With Honey & Fresh Berries
-

- Oreo And Yogurt Pie With Honey & Fresh Berries
-

- Oreo And Yogurt Pie With Honey & Fresh Berries
-

- Oreo And Yogurt Pie With Honey & Fresh Berries
-

- Oreo And Yogurt Pie With Honey & Fresh Berries
>
>
Oreo And Yogurt Pie With Honey & Fresh Berries Recipe :
>
Crust
Store-bought orio crust
>
Filling
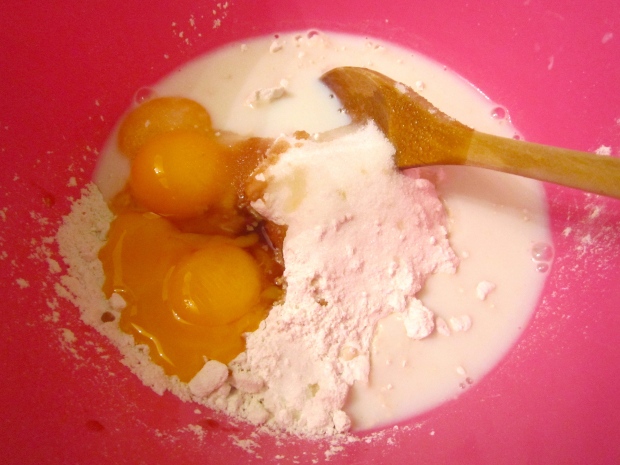
3 large eggs
1/2 tablespoon honey
1 teaspoon pure vanilla extract
1 1/2cups full fat Greek yogurt
1 egg yolk, whisked with a tiny pinch of salt
>
Garnish
Honey, to taste
Whipped cream
Berries or other fruit of your choice
Chocolate powder to dust
Castor sugar to dust
>
Prep
First – whisk the eggs and vanilla.
Then – whisk in the yogurt.
Brush the bottom of the crust thinly with a beaten egg yolk (moisture-proofing)
Bake the crust 3 minutes ( setting the egg for moisture proofing)
Add the filling to the crust
Place the pie into a pre-heated 375F oven and bake until the filling is set around the edges, but, when the pan is nudged, still quivers like soft Jell-O in the center, 15 to 20 minutes.
Check often in the last few minutes, as over-baking will destroy the silky-smooth texture of the filling.
Cool the tart on a rack.
Garnish as pictured or use your own imagination and/or personal preference 😊
>
>
>
>