
Duck For Dummies
>
>
Many folks shy back from preparing duck because of it’s stigma of being difficult to prepare. Now, I admit, duck can be royally screwed-up if you don’t know what you are doing, just like anything else. Many chefs, in order to hoot their own horn, will also try to convince you that cooking duck, especially a whole duck, is difficult and can only be mastered by an expert. While everything is easy if you are an expert, cooking a whole roasted duck doesn’t have to be difficult or fussy. With just a few hours’ roasting and hardly any work at all, you can have a very tasty, very tender, very juicy bird with very crisp skin.
All you need is a duck (you don’t say), salt, a wire rack and an oven. No need for fancy seasoning, fancy equipment or anything else fancy. Duck meat is very tasty in itself, so you don’t need to get into complicated spices, glazes, etc. In fact, you only need a sauce with your duck if you serve a starchy side-dish.
If you opt to enjoy the duck by itself, either as a main course or an appetizer, the meat alone, without any distraction such as a side dish or sauce, should make you a happy camper.
The following recipe is absolutely foolproof.
The result looks great, tastes like heaven and its texture is textbook-perfect; moist and tender on the inside, crackling-crisp on the outside, with all the fat between the skin and meat rendered and with a perfect color to boost 🙂
>
Bon Appétit ! Life is Good !
>
>
Duck for Dummies Recipe:
>
Ingredients:
1 med size duck
Kosher salt to taste
>
Method:
Pre-heat oven to 400F
Prick skin and fat of duck all over, remove excess fat-flaps
Season duck generously inside and out side with the salt.
Place duck breast-side down on a wire rack which rests on a sheet-pan.
Place into oven, immediately turn temperature down to 300 F
Roast duck for 3 hours and 45 minutes, turning duck every 30 minutes
After 3 hours and 45 minutes, increase heat to 420F, roast duck breast side up until skin is very crisp and golden, about 20 to 30 minutes.
Let duck rest for 10 minutes before carving.
>
>
Click here for more Duck on ChefsOpinion
>
>
Duck For Dummies
>

Duck For Dummies
>
>
>
Preparation :
To read instructions, hover over pictures
To enlarge pictures and read instructions, click on pictures
>
>
>
-

- whole medium size duck
-

- remove excess fat-flaps, prick skin/fat all over, season inside and out with salt
-

- place duck and excess fat on a wire rack, place rack on a sheet pan, cook according to the recipe on this page
-

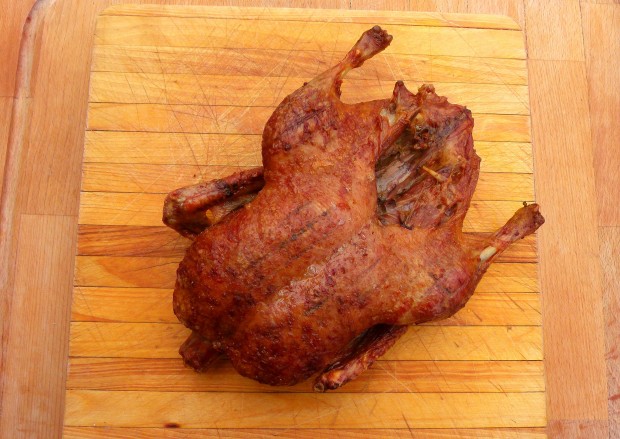
- remove duck and let rest for 10 minutes before carving; strain rendered fat to be used for other recipes such as stir fries and sauteed potatoes
-

- during her well earned rest………..
-

- rendered duck fat
-

- rendered duck fat
-

- Duck For Dummies
-

- carve duck according to your preference
-
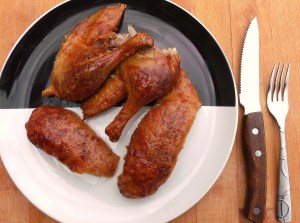
- Duck For Dummies
-
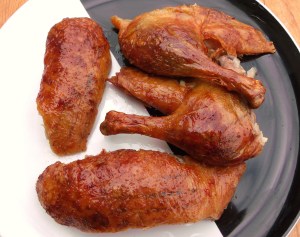
- Duck For Dummies
>
>
>
>

Happy New Year Hans. Wishing you the best in 2017!
LikeLiked by 1 person
Thank you Peggy 🙂
Same to you and your loved ones
Cheers !
LikeLiked by 1 person
Roasted Duck! If everyone knew how good it tastes then the cost to buy it would be double. Check out my post last year on Duck with oranges my families favorite.
LikeLiked by 1 person
Hi Daniel,
pls provide a link to that post.
Thanks.
Hans
LikeLike
Hans,
It is on my blog at you will need to scroll down some to view it. Hope you like it and leave comment if you do. Keep up the great posts, I really enjoy your German recipes. Do you have one on Sauerbratin?
https://chefpliska.wordpress.com
LikeLiked by 1 person
Here we go, Daniel:
LikeLike
Thanks Hans. This looks great when I worked in Dusseldorf I heard that there are four national types of Sauerbratin, variations from different regions. Was that a true statement. Happy New Year and looking forward to your posts in 2017.
LikeLiked by 1 person
Your duck looks great!
Some questions:
– Do you set the oven to fan forced convection or static?
– Do you have a regular household oven?
– Would this work to make Peking duck? (First blanch the bird in boiling water with soy and honey)
– Your duck seems quite small, what weight was it and do you recommend any adjustments for a larger size?
LikeLiked by 1 person
Hi Stefan,
– I have an regular household oven, no convection.
– While living in Asia, I have used different methods to prep Peking duck, so I am sure this would work. However, you’ll get the best result if you have an oven large enough to hang the duck while roasting.
– the duck was about 4.5 lbs. Add another 20 minutes at 300F for every additional 1/5 lb.
P.S.
for an even better duck, roast at 152F for 11 hours, then at 420 until crisp.
Cheers !
LikeLiked by 1 person
PS there is a funny typo in the part where you talk about uses for the rendered fat 😉
LikeLiked by 1 person
Thanks, Stefan, I fixed the typo 🙂
LikeLiked by 1 person
Great post Chef, thanks for keeping it simple. I don’t roast duck at home, but it’s about time. I look forward to seeing your work in this new year. Thanks for sharing,
Best Wishes,
Richard
LikeLiked by 1 person
Thank you Richard 🙂
Happy New Year !
Cheers !
LikeLike
I LOVE duck!, I often discuss that, if done correctly, it is not fatty and certainly has more flavor then many of the poultry relatives. I even did a lesson recently and surprised the group
LikeLiked by 1 person
Scott,
I used to say to my students “cooking is easy – if you know how to do it”
Cheers !
LikeLike